The Montero Sport Project
A page dedicated to documenting my quest to turn an average grocery getting SUV into a very capable expedition vehicle.
How It Began
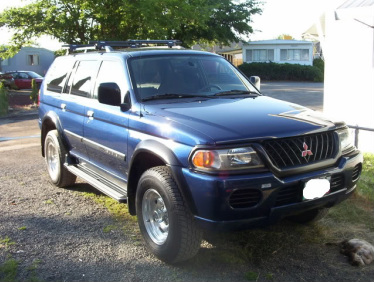
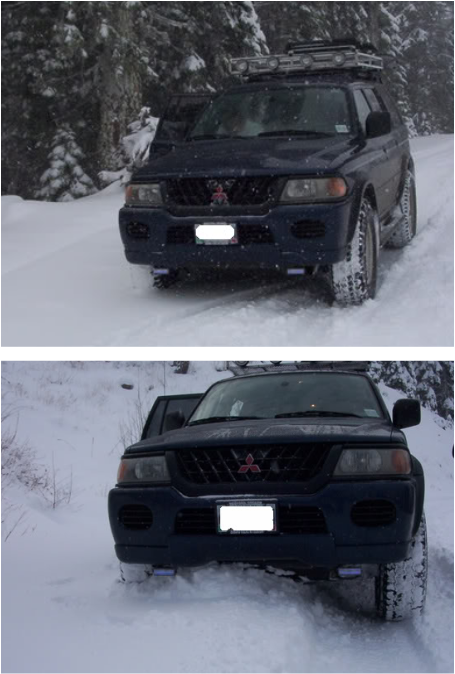
This 2001 Mitsubishi Montero Sport came to me as a normal, run of the mill SUV with a 3.0 v6. Since then, I have been actively altering it's condition a little bit at a time with one goal in mind- to create a very capable expedition vehicle.
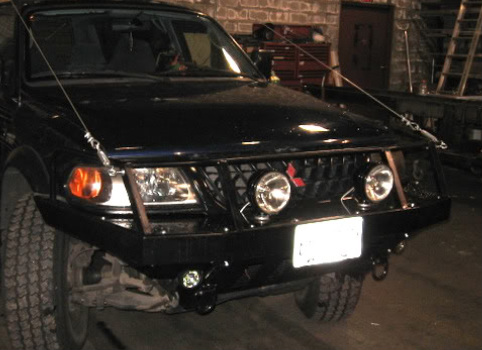
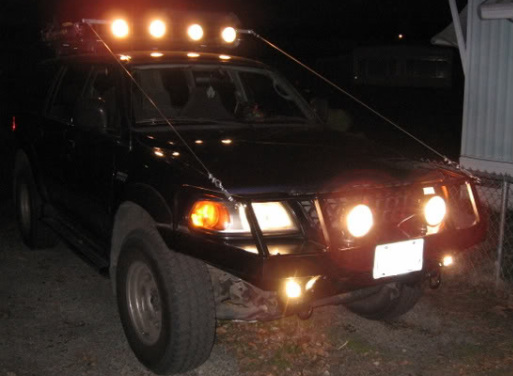
Step 1: A Roof Rack
Any good expedition vehicle needs extra storage capacity as well as a spot to mount auxiliary lighting. So to the drawing board I went with pencil, and sometimes keyboard, in hand. I designed a lightweight aluminum frame basket with provisions for snowboard racks. 4 lights in the front and 2 in the back completed the design. Now off to the powdercoaters.

Step 2: Traction is Everything
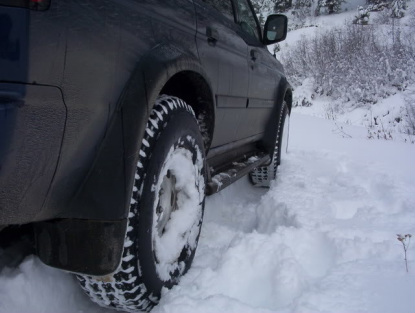
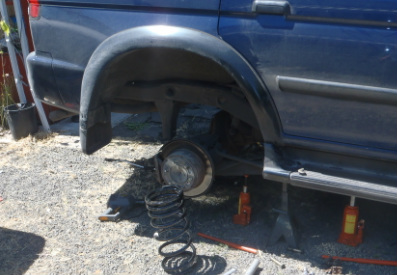
Bald tires will get you no where fast. So the next thing I decided to change was tires. The original tires were 245/75 R16. I wanted to go a little bigger and get into a more common truck tire size so after a little research, I purchased a set of 265/75 R16 Wildcat tires from a local Les Schwab store. I decided that it could also use a little lift. To accomplish this I purchased two sets of spring spacers for the back and cranked the torsion bars on the front. This gave me around 1½" of lift. Just right. For information on how to crank the torsion bars on a Mitsubishi Montero Sport, visit Yoshi's Montero Page for step by step instructions with pictures.
The final thing I must do in this upgrade is a road test, or should I say "snow test". The Wildcat tires performed great. Traction is everything!
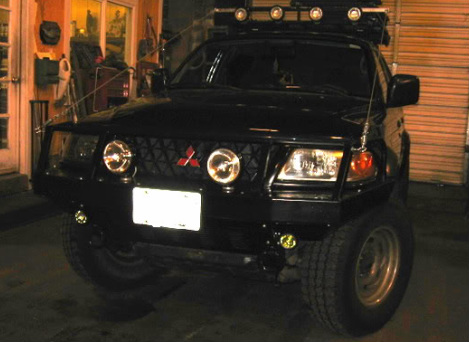
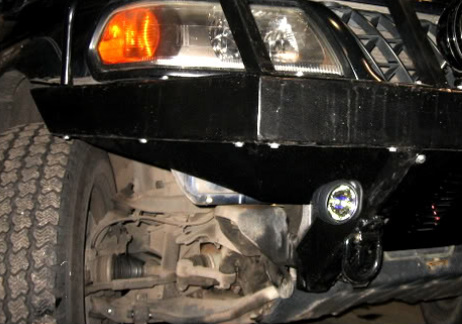
Step 3: A Heavy Duty Bumper/ Brush Guard
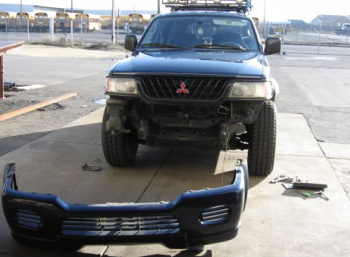
That's right! You have to protect that front end. Off to the drawing board again. Besides, I would much rather "remove" the front bumper than "rip it off" on some challenging terrain. I think most would agree with that. Along with designing and building the bumper, one more challenge arises. What do I do with the windshield washer fluid tank? It is not in the most opportunistic location so I will have to move it. But where? It is a very irregular shape made for inhabiting only one spot on the vehicle. The solution? I bought a generic Antifreeze overflow tank and used the old pump and put the whole thing in the engine compartment. After rewiring and re-plumbing the connections I can spray my windshield again.
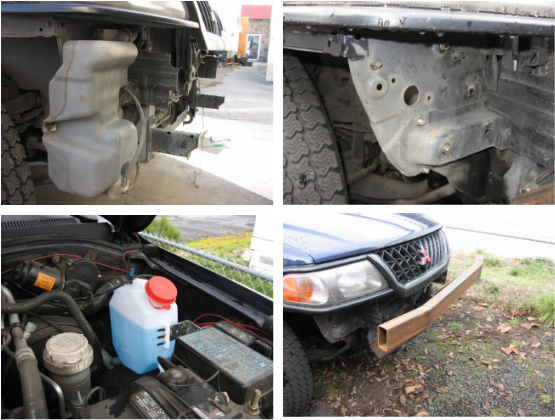
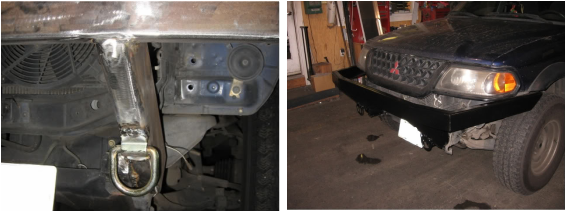
The main framework of the bumper is constructed out of 2x4" square steel tubing. This includes the uprights and the perimeter. Those are 10,000lb rated recovery loops welded to the uprights as well.
The brush guard uprights are 1 1/4" square steel tubing while the horizontal pieces are 3/4" round tubing.
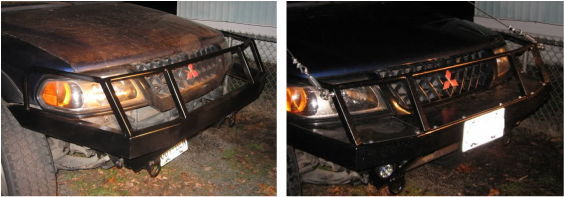
The covering is 16 GA sheet steel bolted to the top, front (louvered), and bottom corners. This finishes up the project.
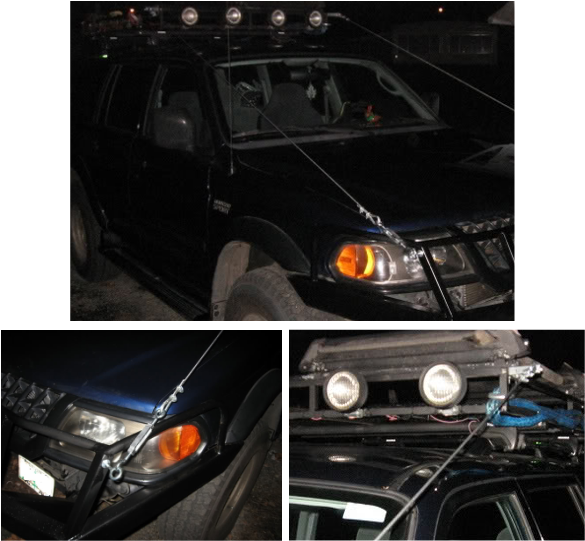
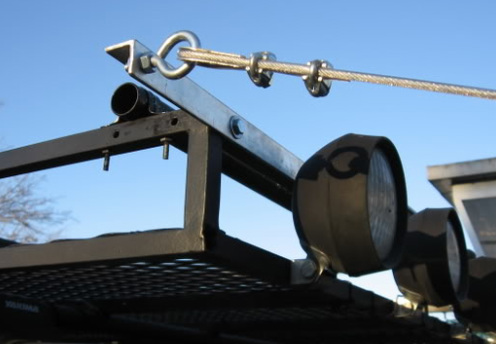
Step 4: Limb Lifters
Yes, after all of that work I really don't want some wayward tree branch to rip off my roof rack. So what's a guy to do? The answer, limb lifters to the rescue. Basically I attach some 3/32" vinyl coated cable from the roof rack to the brush guard and viola, branches, animals, and small children are deflected up and over! (just kidding about the kids and animals, well at least the animals he he he) I think these will work just fine. And yes I can still open the hood!
Parts Required:
UPDATE:
The original metal L-brackets bolted to the side of the roof rack to hold the I-bolts bent forward under the pressure of the tight cables. To fix this problem I dug out a piece of aluminum angle from the shed, cut two pieces, and bolted them to the roof rack perpendicular to the force of the tight cables. So far success.
- 18' 3/32" vinyl coated steel cable
- 4 I-bolts
- 2 turnbuckles
- 4 cable eyes
- 8 1/8" cable clamps
UPDATE:
The original metal L-brackets bolted to the side of the roof rack to hold the I-bolts bent forward under the pressure of the tight cables. To fix this problem I dug out a piece of aluminum angle from the shed, cut two pieces, and bolted them to the roof rack perpendicular to the force of the tight cables. So far success.
Step 5: Fog Lights
A couple of years ago I had accidentally ripped one of my fog lights off while driving through a creek bottom. Then the one working light stopped working a couple months ago. When I started the new bumper project, I planned to buy a new set of fog lights seeing as the old set was not in the best shape. Installation was simple and I got to use the wiring from the previous lights. These will be a nice addition to the ever-changing Montero Sport Expedition Vehicle.
After the initial test, I can definitely say that these lights are brighter than the headlights are. They are great. Now all I need is some fog, hee hee!
Step 6: KC Highlighters
Years ago I had an International Scout II and on that Scout I had a pair of KC's which someone gave me. Since then, the motor blew up and I got rid of it. Yet before I sold it I took the KC's off and have been storing them since. It is time that the KC's ride again and with a new flashy custom bumper to put them on, they will be a perfect addition to the Montero.
Now officially wired and ready for service. I wired these to the same switch and relay that controls the overheads on the roof rack. I figured that if I was running the KC's, I would most likely be running the roof rack lights as well. So why not wire them together? Now with the flick of one switch, they all come on.
Step 7: Communications
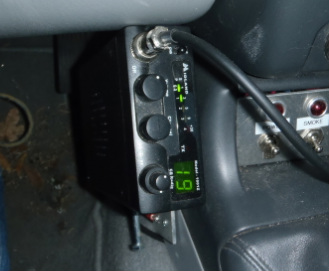
Being able to communicate is important and sometimes a cellphone just will not do. I chose to install a CB (Citizen's Band) radio in the Montero. Now I can talk with many people at once. This can be a very handy source of information when it comes to road conditions and hazards. You don't even have to talk to get the info, just listen to the truckers (warning: can be rated R sometimes), they talk all the time. Learn if there is snow on the pass or an accident a few miles ahead and the infamous "bear" reports. These radios also pay for themselves on logging roads. Many times when you first pull onto an active logging road, there will be some numbers spray painted on a tree next to the road ( example: ch19 ). This usually refers to the CB radio channel that all of the log trucks on that road are using so they can coordinate passing by one another on those skinny little roads. Just tune to that channel and let those guys know your headed up. It sure beats losing a deadly game of chicken with a big rig. The CB radio can also be used in an emergency. Most all law enforcement officers monitor channel 9, so keying up your mic on this channel is like dialing 911. The final bonus for having a CB in your vehicle is that if you and your buddies, spouse, parents, or family members all have CBs in their vehicles, you can chat without using cell phone minutes and if your in a group traveling somewhere (4x4 expedition, family vacation, etc) everyone can hear when you announce that you are taking the next rest area exit because you really have to pee.
Step 8: Navigation
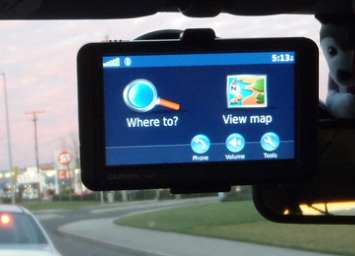
GPS, God's gift to the explorer. How did we manage before this wonderful contraption? I know I did not explore every skid road and always made note of side roads I turned down. This GPS is the Garmin Nuvi 265W. In addition to a wonderful mapping system, it also has bluetooth for connecting to your cellphone making it the perfect hands free device. These are great to have on any kind of trip or just running around town. It really is like having an electronic version of the yellow pages at your finger tips. I was also quite surprised to find that most forest roads are shown on the built in map making it very nice when I have to go to remote transmitter sites for work.
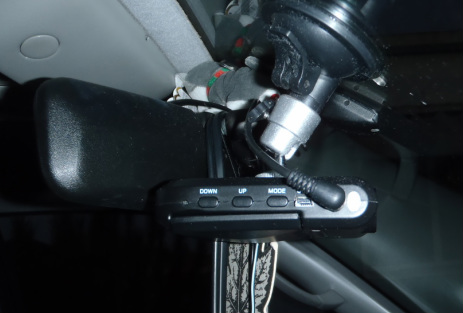
Step 9: Dash Camera
Let me start by saying that I have wanted a device like this ever since I started driving. I have tried unsuccessfully many times to duplicate the functionality of this camera (video camera on a tripod buckled into the passenger seat or taped to the dash etc...). I got this unit off of ebay, "direct from China". It shoots an standard 720x480 picture and is all automatic. When I turn the car on, it starts recording. When I shut the car off, it stops recording. It continually records on an SD card and when the card fills up, it begins recording over the oldest clips. What does this mean you ask? It means I don't have to do a thing until something worthy of being videotaped happens in front of my car. When I get home, I pop the card out, pop it in my laptop, copy the file and I am done. No buttons to push, nothing to remember to turn on or off. Just pure simplicity. Now I will have footage of driving in the woods, or of that dumb-ass cuts me off, or something extraordinary that happens while driving somewhere. And the best thing of all is that the images will be captured and I won't have to do anything. Videos to come...
Step 10: Scanner
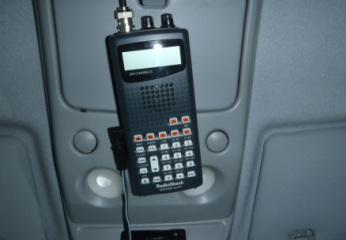
The ultimate way to get information on events as they happen. How many times have you seen the cop blow by you at mach 2 with lights and sirens and wondered where they were going at such speeds. Or driving by a store that is circled by 5 cruisers and the SWAT team van and just wanting to know what is going on? Well this is the tool that you need. It is amazing the amount of information you can get from a scanner with the right frequencies programmed in. And now with this model (Radio Shack 20-404), it has a button you push and it will scan all of the police and fire frequencies automatically. Very handy when you travel out of town and don't know the local frequencies. That is why I picked this model for the car. In addition to police and fire, you can also listen to air traffic, marine radios, walkie talkies, ambulances, trains, Ham radio operators, weather, Forest Service, BLM, game warden, timber operations, and even the space station. A great addition to the Montero Sport.
New Tires Already?
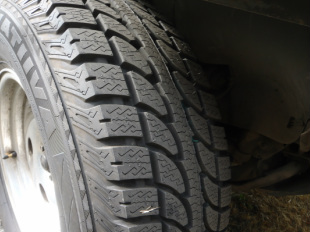
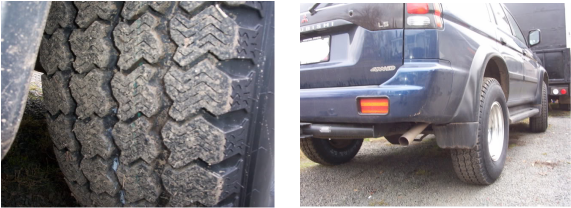
The Wildcats finally wore out. And what did I replace them with you ask? I purchased a set of Nokein Vativas. The tire man that I spoke with said that the rubber compound that the tires are made from actually get softer as the temperature drops. Perfect for winter driving and nice and quiet on the highway. I guess time will only tell if they will outlast the Wildcats. An extra bonus, I got 10 plys cheaper than 6 or 8 plys because of excess stock from last year. Better sidewall strength is always a plus on expedition vehicles. After testing on steep dirt roads I must say that I am impressed. I can hardly wait until it snows and I can really test them.
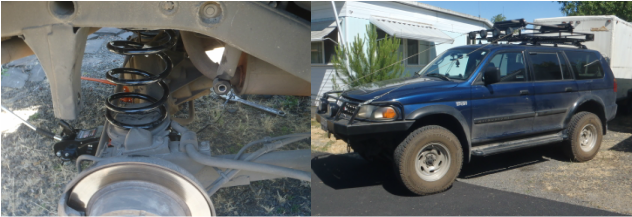
Step 11: Old Man Emu Lift Kit
I finally did it! Yes, I purchased the Old Man Emu heavy duty rear springs and cranked the torsion bars even more. I got so tired of the spring spacers I had on the stock springs because in the course of normal driving they would move around an inevitably stop moving once they got together and located themselves next to the framerail. This in turn created some clearance issues that resulted with the spacers rubbing on the frame causing this annoying squeaking/ creaking sound with each and every bump. Now it is great. The truck handles better, rides smoother and is ready for more weight and rough roads. A definite must for any expedition vehicle.
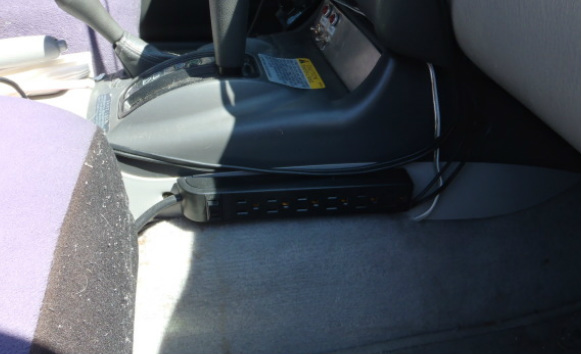
Step 12: AC Power
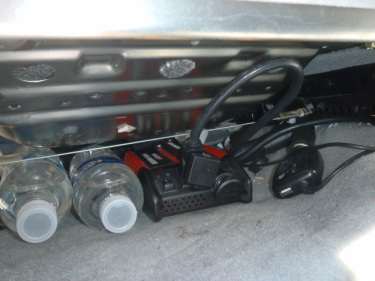
How handy would it be to have AC power in your vehicle while you drive. Or have the ability to run a power saw while the car idles. Well I thought that it would be great, so I installed a power inverter under the front passenger seat. It is plugged in and turned on all the time so if the key is turned on, I have AC power. I then mounted a power strip to the passenger side of the center console and also ran an extension cord under the seats and carpet to the back. There is enough left to stretch 10-12 feet out the back hatch.
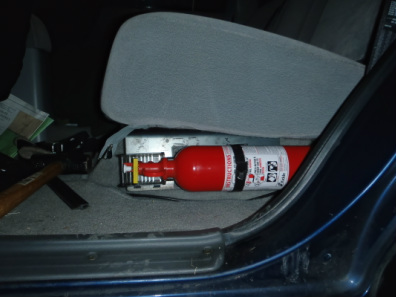
Step 13: Fire Extinguisher
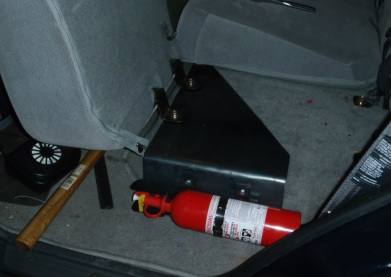
A fire extinguisher is something that I believe that all vehicles should carry as standard equipment. I think that all new cars should come with them right along side the jack, spare tire, and lug wrench. I placed mine under the back seat next to the door. My logic in choosing this location is that I can open a door and get to it quick even if I have the back seats folded down and the entire back filled with crap, er uh I mean useful gear. You never know when you might be faced with a fire. It would really suck to be out in the middle of nowhere and have a power cable going to an amp short out and catch your carpet on fire and have no way to put it out (yes, a little bit of personal experience). It might not even be your vehicle or a vehicle at all. What is important is to be prepared for fires because they do happen and usually at the most inopportune times. Now that I have lectured on the merits of carrying a fire extinguisher, next comes how to carry it. I decided that I would fabricate a mount for said fire extinguisher to avoid the extinguisher from becoming a loose projectile inside the truck in the event of an accident or rollover. Now it is mounted nice and tight and out of the way.
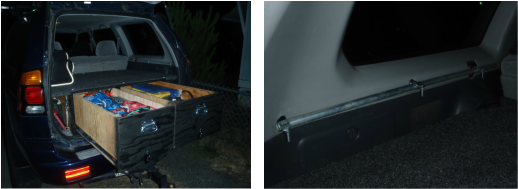
Step 14: Rear Storage Cabinet

My goal in building a rear storage drawer system was to make the most efficient use of my space as possible. Now I can load up the back with bags, suitcases and coolers and still be able to get to my recovery gear or tire chains. The entire box system is tied to the floor using d-rings and turnbuckles. That way if I get into an accident or roll the Montero, the box and it's contents stay in place and not create numerous loose projectiles floating around looking for a head to hit. In addition to tying the box down, I installed 6 d-ring anchor points on the top of the box for tying down additional cargo. Using 1/2" emt conduit and some conduit clamps, I also created a tie off rail on both sides in the back. Now, whatever I place in the back can be safely secured which is very important on the more aggressive mountain trails in the Pacific Northwest.
Future Modifications
A small "wish list" of things I would like to do to the Montero, time and money permitting!
- Silverstar headlight bulbs
- Heavy duty skid plate on the gas tank
- ARB Air-locker for front and an Eaton Posi for the back (now I'm dreaming)
- Snorkel (now I'm really dreaming)
- Rock sliders (nerf bars)
- Accessory battery and isolator
